


 Subscribe
If you're reading this article, you're in the market for your first projector or just a home theater enthusiast expanding your knowledge. Either way, we're happy to help. The joys of front projection are many, but it's not like buying a TV. Projectors are part of a two-piece system that includes a matched screen. And finding the right projector means choosing among three different light sources and three imaging technologies, then insuring the projector has enough brightness for your environment and desired screen size—not to mention sufficient contrast and color accuracy to honor your favorite movies, TV shows, and sports. It's a lot for newbies to get their heads around.

In this article, we'll teach you everything you need to know. You'll learn about the different parts of a projector and about screens. Then we'll take you step by step through the process of buying a projector: determining throw distance, screen size, and brightness requirements; understanding projector features; and utilizing ProjectorCentral's extensive projector database and resources to zero in on your short list of models. So let's get on with it!
Why Projection?
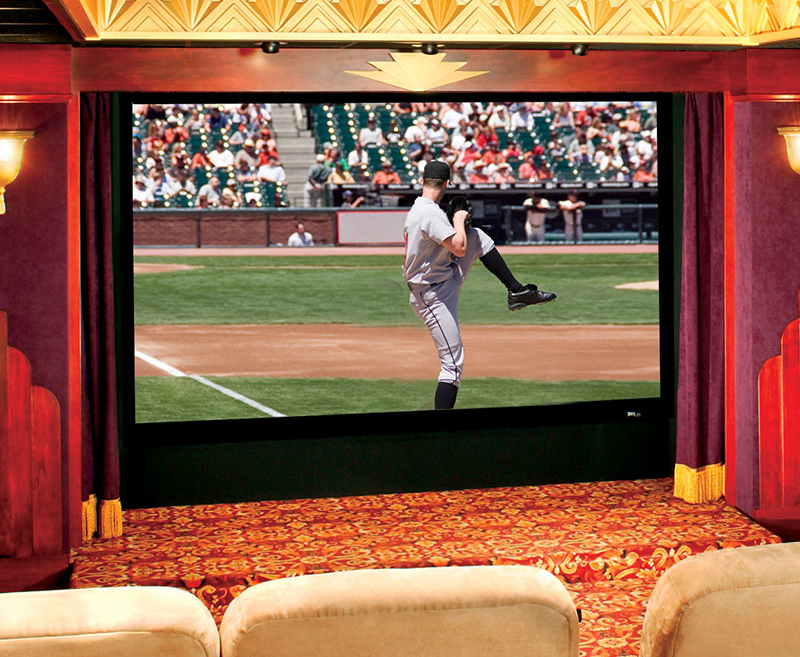
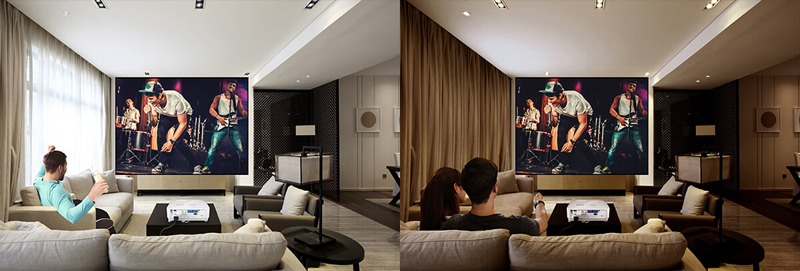
Simply put, when it comes to watching movies or playing video games, bigger is always better. Sitting at appropriate distance from a 100-inch or larger image engages more of your peripheral vision, lets you see details that are lost on most TVs, and sucks you into the story in a way that's just not possible with even a 75- or 85-inch flatpanel. If you turn off your phone like you do down at the cineplex, it makes movie viewing a true escape.

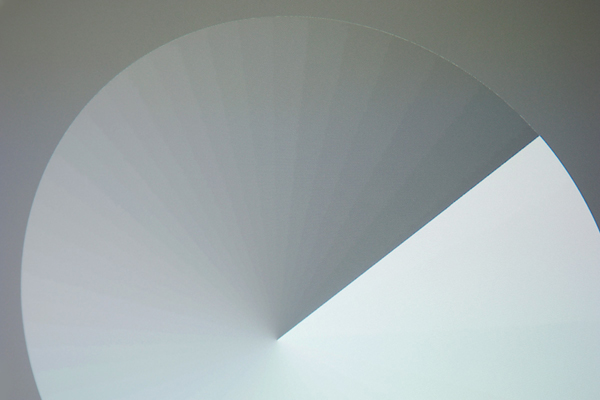
Try this demonstration. Stand by your window and take in the outdoor scene in all its action and glory—the width, depth, and breadth of it. Now step back 10 feet and look through the same window. The scene is the same, but shrunk, and you're viewing through a picture frame. This is how most people watch on a 55- or 65-inch TV.. What they're really seeing is an image of their home furnishings surrounding a window with tiny figures dancing about in it. This is why no one would ever mistake watching TV with being at a movie theater.
On the other hand, a projection home theater is very effective at mimicking the theatrical experience and its high level of engagement. And projectors remain—by far—the most cost effective way on a per-inch basis to attain pictures of 100-inch diagonal or larger.
There's something else that's special about projected images. Unlike a television, which blasts your eyes with bright, emissive light, a projection comes to you as a reflection off the screen. That's how we view most objects in life—we see the ambient light bouncing off them. Consequently, there is a more natural-looking, organic quality to projected images. You experience less viewing fatigue, and the picture better communicates the film-like—and lifelike—aesthetic that cinephiles so appreciate.
Now, some of you might say, "Okay, that's great. But when I'm not hunkered down with a bowl of popcorn for movie night, I watch TV with the lights on. You can't do that with a projector."
Well...it's true that you'll get the best performance from any projector in a dark room. But today's ever-brighter projectors, mated with the latest ambient-light-rejecting screens, can function just like a TV in high ambient light. There's even a new class of ultra-short-throw living room projectors designed just for this purpose. We'll say more about ALR screens and these specialized UST projectors later.
What's Inside a Projector?
Before you wade into projector shopping it's helpful to understand how they work.
In the most simplistic terms, every modern digital projector has three primary components:
- A light source that creates the light for the image. In today's projectors this will be a traditional lamp, a bank of laser diodes, or a bank of LEDs (light-emitting diodes).
- An imaging chip or chips that generate the image based on the video source signal. This will typically be either a single Digital Light Projection (DLP) micromirror device, a trio of LCD (liquid crystal display) panels; or a trio of LCoS (liquid crystal on silicon) chips.
- A lens and associated optical elements, which are used to generate color and project the image onto the screen.
Projection Light Sources
Our Tech Talk article "Lamp, Laser, or LED Projection: Which Light is Right?" gives you the deep dive on projector light sources. Here's a quick overview.
Lamps. Traditional lamps still dominate the home theater landscape for reasons of both cost and efficacy for dark-room viewing. They can be specified to get just bright enough for punchy pictures on a big 100- to 150-inch screen, but not so bright that the projector's baseline black level and contrast look unreasonably gray and washed out. The brightness of a lamp projector is also easily mitigated scene-by-scene with a dynamic iris, which partially shutters the lamp's output to deliver better contrast on dark material.

The downside? Lamps run hot, drift in color balance over time, and lose brightness as they age. Most are rated for around 4,000 hours of viewing in the projector's brightest picture mode before reaching their half-life, or half the brightness of a new lamp. This period may be extended if you don't need to run the projector at full power, but when a lamp reaches half-life, it should be swapped out. You'll want to check the replacement cost of the lamp for whatever model you purchase.
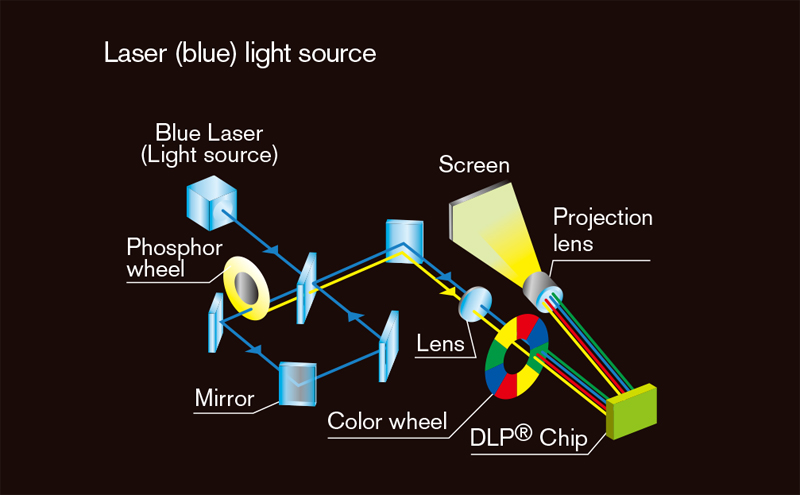
Laser. Solid-state laser light engines are taking over the commercial projector market. With no lamp replacements over the 20,000-hour life of the projector and low or no maintenance requirements, it's easy to see why. However, while the cost of the blue-laser modules used in most of these projectors continues to drop, laser has not yet strongly permeated the home theater arena. Sony and JVC use lasers to drive their highest-end models, but some lower-priced laser projectors targeted at home theater have proven to perform well below lamp-based models in terms of color gamut, color accuracy, and contrast. If the fear of lamp replacements is enough to put laser high on your list, read the product reviews carefully.
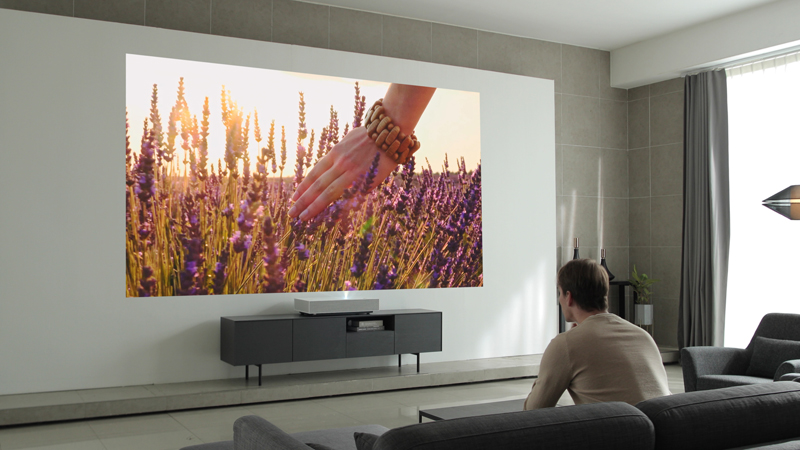
That said, if you intend to use a projector as a TV replacement in your lit family room, 4K UST laser projectors are the exception to this rule. Their high brightness l is a plus. Likewise, their potential limitations on low black level aren't noticeable in ambient light, and the best models provide more-than-acceptable contrast in both dark-room and bright-room viewing when mated with an appropriate ALR screen. You can learn much more about these projectors in The Ultimate Guide to 4K UST TV Projectors, where we have a full product listing.
LED. LED's have the advantage of running cool and providing a compact light source that, like laser, lasts the life of the projector. This makes it ideal for briefcase- or pocket-friendly portable DLP projectors. Unfortunately, the brightness limitations and inherently wide light-spread from LEDs usually prevents this technology from delivering the punch required for serious big-screen home theater. This statement even takes into account the oft-repeated fact that light from LEDs is perceived as brighter than light coming from a lamp—a phenomenon you can read about here. But manufacturers are working on solutions. As with any emerging technology, make sure you watch for positive reviews before you buy.
Projection Display Technologies
ProjectorCentral has an in-depth Tech Talk article titled "LCD, LCoS or DLP: Choosing a Projector Imaging Technology," that provides a detailed resource on this subject. Here are the basics.
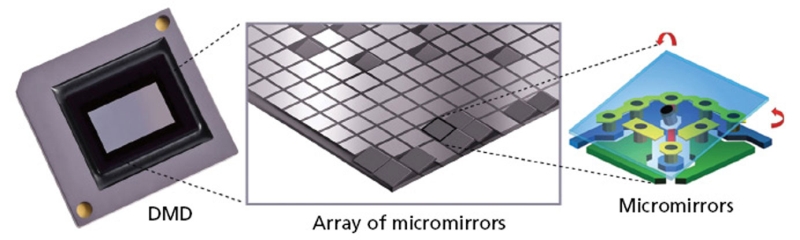
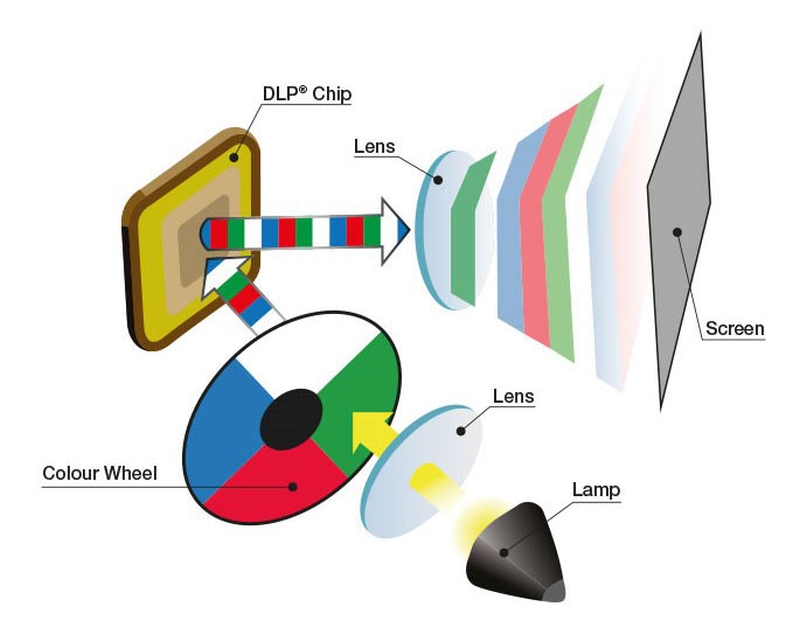
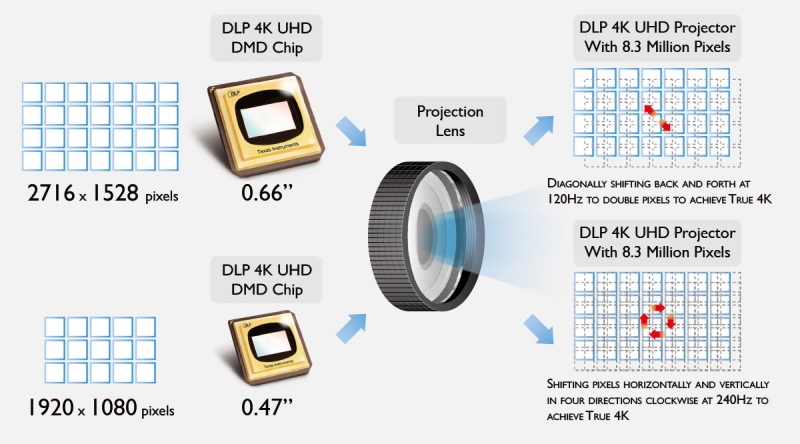
DLP. By far the most popular technology found in projectors of every type and size, Digital Light Projection is an invention of Texas Instruments that has revolutionized the projection world. DLP projectors utilize one or more electro-mechanical imaging devices called DMDs, or Digital Micromirror Devices. These present an array of tiny, pixel-sized mirrors to the light source—as many as 8.3 million in a native 4K-resolution DMD measuring just 1.38-inches wide. The mirrors each pivot on their own post, and can be independently positioned to direct a point of light to the screen or to dump it into a light-absorbing area, thus leaving that pixel dark. The mirrors oscillate at different speeds to brighten or darken the pixels as needed.
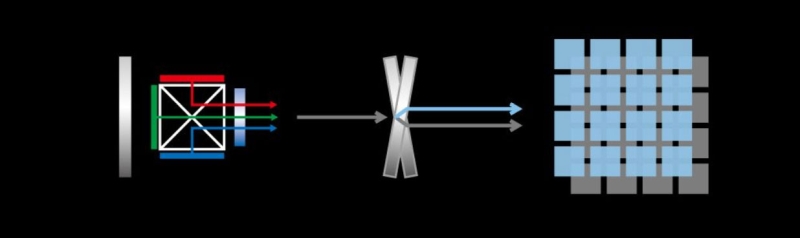
Though some high-end commercial and digital cinema DLP projectors use three DMDs to simultaneously serve up the red, green, and blue color components of the image, the vast majority of DLP projectors use a single DMD chip to save cost. This makes high quality home theater and portable projection available at relatively low cost, but also creates an important distinction between DLP and the other imaging technologies. Like those high-end DLP projectors, LCD- and LCoS-based home theater projectors have three separate chips to simultaneously present the red, green, and blue elements, which get combined into a full-color image. However, single-chip DLP projectors present these images sequentially by passing white light (typically) through a translucent, spinning wheel with colored filters. The different color components of the image are presented so rapidly that the eye blends them together.
There are two drawbacks that accompany the use of a sequential color wheel in any projector: (1) the potential for rainbow artifacts, in which fleeting rainbow-like banding may appear on the edges of some objects; and (2) unequal white and color brightness, which may result in some colors looking less saturated or accurate. Some viewers are more sensitive to rainbows than others, and some projectors generate more rainbows by virtue of their design. Fortunately, engineers at the major DLP projector brands, including Optoma, BenQ, and ViewSonic, have figured out how to minimize rainbows. Still, we always report on this phenomenon in our reviews and recommend that, if you're sensitive to rainbows or don't know if you are, you should buy from a retailer who will accept a return or swap.
The subject of color vs. white brightness remains somewhat controversial. Not every 1-chip DLP projector suffers from lower color brightness compared to white, but this is a demonstrable phenomenon on models that use a clear (white) or yellow segment in their color wheel to boost brightness. Projectors that feature DLP's Brilliant Color technology usually have a control to adjust the white/color brightness balance. Nonetheless, for all the criticism leveled at this DLP shortcoming—usually from the 3-chip LCD and LCoS camps—it's not likely to create a bothersome or even noticeable performance difference for most viewers. ProjectorCentral explored this topic in our article "ANSI Lumens vs Color Light Output: The Debate between LCD and DLP." You can also read more in the "3-Chip vs. 1-Chip DLP" section of the previously referenced article comparing LCD, LCoS, and DLP technologies.
LCD. LCD projectors shine a light source through translucent liquid-crystal panels whose pixels can be individually opened or shuttered by the video signal to make them brighter or darker. As noted, separate LCD imaging chips for the red, green, and blue picture elements are typically employed, hence the "3LCD" branding associated with them. Several manufacturers make 3LCD projectors for business, education, and other commercial applications, but Epson remains the only major brand selling LCD projectors for home theater.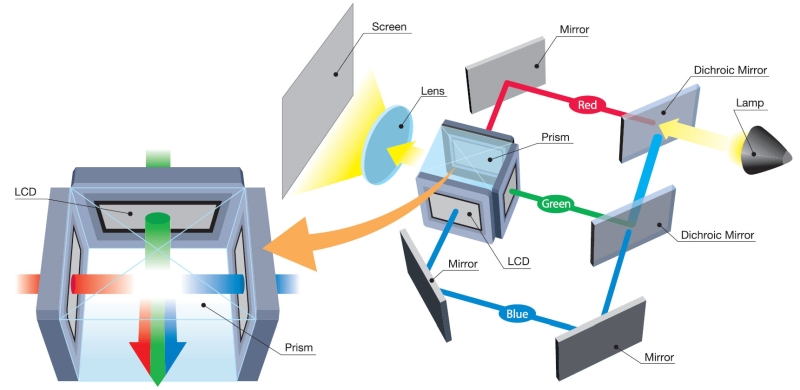
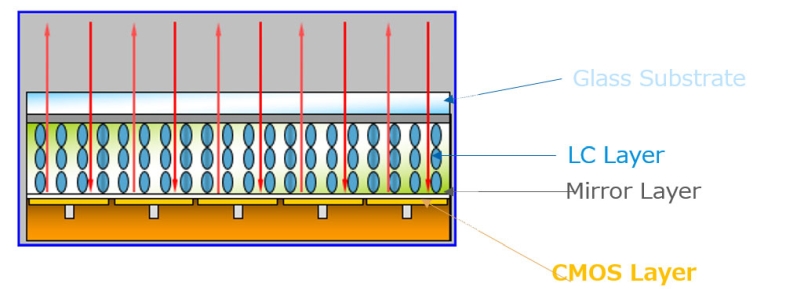
LCoS. LCoS, or liquid-crystal-on-silicon, is a variant of LCD. Instead of light passing straight through the LCD panel, it is enters through the front, hits a reflector, bounces out, and is directed through the lens to the screen. LCoS is more expensive than LCD but offers some key benefits, including the valuable potential for lower native black level and high contrast. As with LCD, three separate LCoS chips are dedicated to the red, green, and blue components. Only two manufacturers make LCoS-based home theater projectors: JVC, with its D-ILA (Direct-Drive Image Light Amplifier) technology, and Sony with SXRD (Silicon X-tal (crystal) Reflective Display).
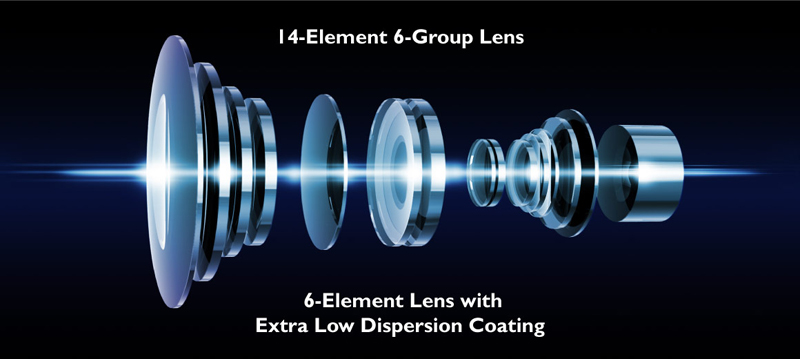
Lenses. It's easy to understand that a projector's sharpness would be undermined by a poor lens or other optical elements placed in the light path. The best lenses are made of high quality glass, with multiple elements (and "groups" of elements) that help eliminate aberrations—usually, the more elements, the better and more expensive. Today's 1080p-resolution budget projectors in the $500 to $1,000 range from the major brands come with surprisingly good lenses and deliver sharp and essentially uniform images. When you step up to UHD/4K-resolution, the lens requirements shoot up, which—along with the more expensive imaging chips—is a factor in the higher cost of 4K projectors. If a projector manufacturer has gone out of their way to tout the optical quality of their lens (beyond mentioning its zoom or lens-shift features), it's because they want you to know they've paid attention to this important component and that it's one of the things you're paying a premium for.
Beyond their basic optical quality, the lenses on home theater projectors often have some degree of optical zoom capability, and possibly vertical or horizontal lens shift. We'll explain these features later.
Projection Screens
There's a tendency among first-time projector buyers to think they can dismiss the screen completely. Don't do that. Using a white wall may work out for casual viewing from an inexpensive portable projector, but if you're serious about getting the benefits of projection in a home theater or family room you have to have a screen.
You'll have three decisions to make about your screen besides the diagonal image size: the frame design, the aspect ratio, and the screen material.
Frame Design. Most people end up with a fixed-frame screen directly mounted to a wall or hung from the ceiling. The bezel can end up being anything from a 3-inch black felt-wrapped border that hides any stray image spilling off the screen material, to a fine, nearly invisible bezel that gives the impression of an image floating in space. Although screen material can greatly affect the cost of a screen, fixed frame options are always the least expensive.
The usual alternative to a fixed frame is a mechanical or motorized retractable screen that drops down from the ceiling only when needed. These come in flush-mount styles with a canister that attaches to the ceiling or wall, or in-ceiling versions that require more involved installation. Motorized screens typically need low-voltage power cabling or a nearby power outlet, though battery-rechargeable screens are now available. Motorized screens can usually be dropped or rolled with a trigger wire from the projector or other equipment, or via wireless remote control.
Aspect Ratio. Aspect ratio defines the relationship of the screen's width to height. The vast majority of installations use a screen with a 16:9 aspect ratio, or 16 units of width to 9 units of height. This matches HDTV broadcast content, but results in widescreen movies appearing with black letterbox bars at the top and bottom of the screen. Some movie enthusiasts opt for a 2.4:1 aspect ratio, which closely matches widescreen theatrical movies, but typically results in black pillars appearing to the left and right of 16:9 content. There is a lot to consider before planning a 2.4:1 screen installation that will affect the projector you select and how you use it. Our article "When Widescreens Work: How to Pick the Right Aspect Ratio" will provide some additional background.


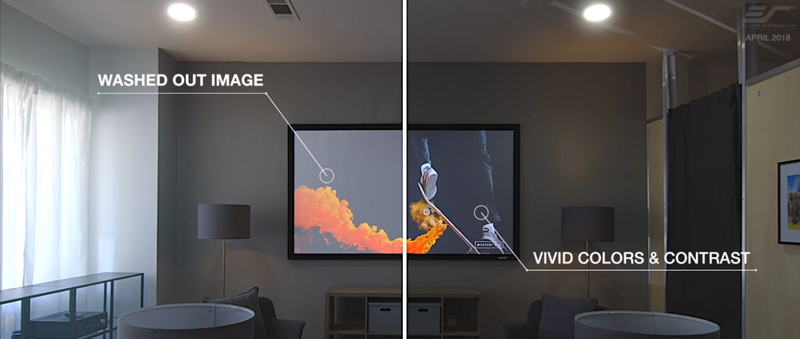
Screen Material. The screen material you select will vary based on your need to combat ambient light. If you plan to view in a dark room, a traditional matte white screen material will best maintain brightness and color accuracy while providing a smooth texture. White screens are also usually the most cost-effective. Gray screen materials boost perceived black level and contrast, usually at the expense of some brightness, and can be an option for dark or moderately-lit viewing spaces. For bright-room viewing, more sophisticated, engineered ALR materials with multiple layers of optical elements will actively direct the projector light back to the viewers while rejecting ambient light. You can read about the different types of ALR screens and how they work in "Screen Magic: How UST Screens Let You See the Light."
You can opt for an acoustically transparent screen when a fixed or drop-down screen will obstruct a home theater speaker system. These allow sound to pass through, though the perforations or weave in the material can sometimes cause visible artifacts depending on the material used. It's best to avoid these screens if you can to better protect both the image and sound quality of your system, but the best acoustically transparent screens minimize the deleterious effects on both.
Screen Gain and Viewing Angle. There are two primary characteristics you'll want to pay attention to with any kind of screen material you're considering. The screen's gain describes its reflectivity, where a gain of 1.0 suggests even reflection—all the light coming in comes out with the same brightness. A 1.0 gain screen will also have the most uniform distribution of light across the entire screen surface, while higher gain screens will exhibit some degree of hot-spotting at the center. Most traditional matte white screen materials are rated from 1.0 to 1.3 gain, with higher gains providing more perceived brightness to viewers sitting in or near the center sweet spot.
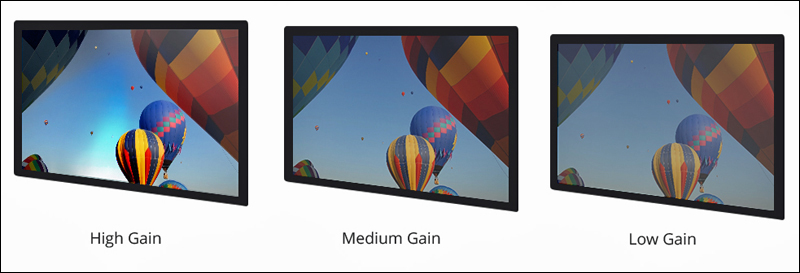
The second key characteristic is the screen's half-gain viewing angle or viewing cone, which describes the how far viewers can move to the left or right of center screen before brightness noticeably drops off. Screens with higher gain above 1.0 will direct more light down the centerline but have a more narrow viewing cone. Our article "What is Screen Gain" will tell you more.
Projector Installation
Now that you have some basics under your belt, you're almost ready to select a home theater projector. But before you can choose the right model there are some practical matters to think about including placement of your projector and screen, the screen size and material, and the mechanical installation.
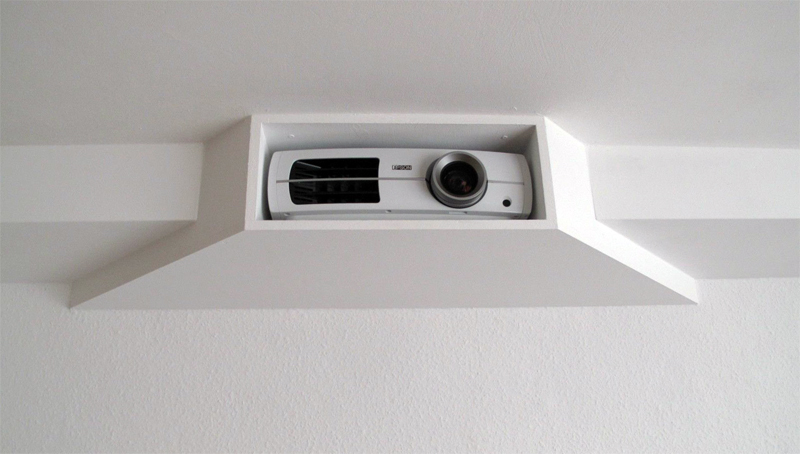
The simplest installation is one in which you pull a projector out of storage, set it up on a coffee table, and project onto a wall (poor choice) or a portable or retractable screen (better). Most permanent installations, however, end up with the projector mounted upside down from the ceiling or placed on a tall shelf or in a cubby at the back of the room. These installations may require not just physical mounting of the projector, but possibly the wiring of a power outlet near the projector, and the running of signal cables inside the ceiling and walls to reach from the source components to the projector location. It's skilled work that a DIYer may or may not feel confident about.

You can, of course, hire a custom electronics integrator to do the work and help you select your projector and screen. That's a highly recommended path that takes all the complexity out of the process and insures a good result. The website of the Custom Electronic Design and Installation Association has a locator to find reputable member companies in your area.
Another option is to consider one of the new 4K UST TV projectors mentioned earlier. These projectors are designed for tabletop placement on an A/V cabinet or credenza situated just a few inches below the 100- or 120-inch screen. Since your TV source components reside in the cabinet, there are no wires to run through walls or ceilings. You can learn more about this category in our Ultimate Guide to 4K Ultra-Short-Throw TV Projectors.
Step 1: Projector & Screen Placement
If you've been thinking about buying a projector you probably already know where you want to put the projector and screen. The likelihood is that architecture or pre-existing seating in your room will restrict the screen placement to one particular wall, and it's just a question of where to put the projector. For a ceiling mount, you'll ideally want the projector somewhat behind the viewers or closer to the front of the room rather than directly above the primary seating, which will minimize the audibility of fan noise that every projector emanates—some more than others. Whether you ceiling- or shelf-mount your projector, tr to keep it aligned with an imaginary vertical line drawn down the center of the screen, rather than off-center to the left or right. This will avoid the need for horizontal lens shift and reduce the likelihood of issues with keystone distortion that disrupts the rectangular geometry of the image.
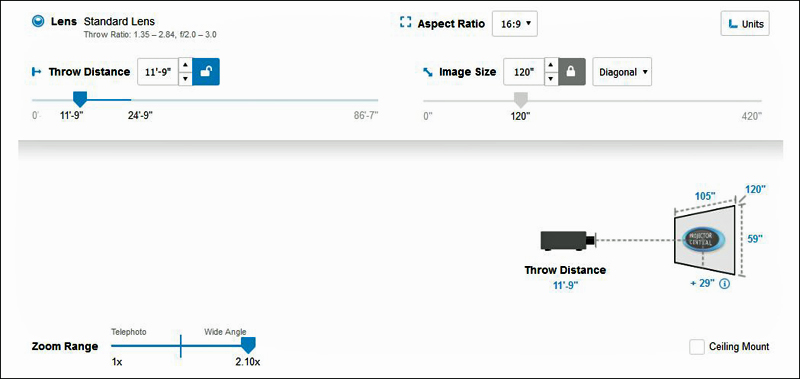

Once you know the expected location of the projector and screen, you can measure the approximate "throw distance" between the projector lens and the screen surface. This is a critical piece of information you'll need to choose a projector. Later on, you can use ProjectorCentral's Throw Calculator, or one provided online by the projector manufacturer, to determine if a projector's lens will accommodate your space requirements.
Step 2: Determine Screen Size
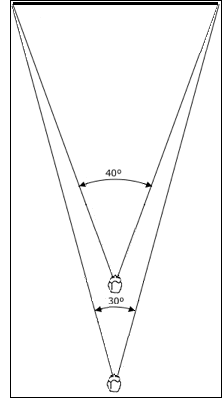
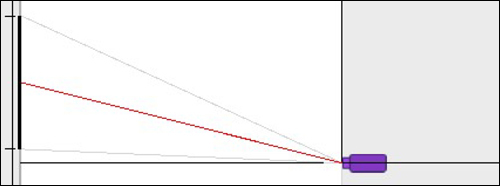
Along with your projector and screen locations, yourseating distance will likely be self-evident. There are industry recommendations for how large a commercial theater screen should be for a given seating distance, with the idea of optimizing the viewing angle for the patrons' peripheral vision. SMPTE, the Society of Motion Picture & Television Engineers, suggests a 30-degree viewing angle from the center sweet spot to the far left and right edges of the screen. THX recommends a 36-degree angle, which would make the picture a bit more immersive. You can visit this online screen distance calculator to see the screen size for each of these with your given seating distance. To give you some idea, if you had a 15-foot viewing distance, the SMPTE recommendation would result in a 110-inch diagonal 16:9 screen, while the THX recommendation would result in a 134-inch diagonal screen.
The reality, however, is that these are only recommendations, and your decision will ultimately be based on your personal taste and available space, as well as your desire to stay within the most cost-effective, industry-standard screen sizes. Do you like to sit further back in the movie theater, very close-up, or somewhere in the middle? And how large a screen can you physically fit on your wall?
Screens come in standard sizes, give or take a few inches. For the average home theater, you'll likely be looking at the 92- to 150-inch diagonal range with a 16:9 aspect ratio, with 100-, 110-, and 120-inch being among the most popular. A great way to zero in on the right size for your room is to tape out a box on your wall with removable painter's tape using the width and height dimensions of your proposed screen size. Then sit back in your viewing chair and see how it feels. You'll know instantly if you need to go up or down a size.
Step 3: Determine Projector Brightness
This is the last step before scouting for projectors, and it's an important one. Let's start with some basic definitions and concepts. Projector brightness is specified in units of "lumens." The major projector brands cite "ANSI lumens" or the nearly equivalent "ISO 21118 lumens," which refer to a pair of industry-standard measurement techniques and allow the brightness of projectors to be directly compared (more or less).
While a projector's maximum lumen output is fixed by design, the amount of brightness it delivers to your screen for reflection back to you will vary based on screen size and other criteria discussed below. This realized brightness is typically measured in "foot-Lamberts," abbreviated ft-L. Ft-L is not a projector specification, but rather a measure of performance of the projector/screen combo.
Note that brighter is not necessarily better with home theater projectors. Too much brightness in a dark theater can lead to viewer fatigue, and the brighter you go the harder it is to maintain lower black level and superior contrast. This is why many premium projectors regarded as having the best contrast and deepest blacks come in with ratings of less than 2,000 ANSI lumens, though projectors intended for bright-room viewing may go to 3,500 lumens or more.
There are some established targets developed for movie theaters to describe how many ft-L you might want coming off the screen in a dark room. SMPTE suggests 16 to 22 ft-L for a dark theater, but many home theater viewers prefer somewhat brighter images. These days, especially if you plan to watch a lot of High Dynamic Range (HDR) content from a 4K home theater projector (more on that below), it's safe to target up to 25 to 30 ft-L as a minimum, though you'll need less for regular Standard Dynamic Range (SDR) programs.
As mentioned, the amount of ft-L that arrives at your screen for reflection back to the viewers depends on two other key factors besides the projector's lumen spec. First is the image size. The larger the image, the greater its area, and the more lumens are required from your projector to achieve a given brightness across the entire screen.
The other critical factor is the amount of ambient light interfering with the projector's output. If you plan to watch in a bright family room, you might want as much as 50 ft-L or more at the screen so it'll punch nicely through the room light—though use of an ALR screen can reduce that need by improving contrast and keeping the darker areas of images from looking washed out.
One more factor that needs to be accounted for is the screen gain. A screen with gain higher than 1.0 will take the light delivered to the projector and throw it back brighter, resulting in more ft-L presented to a viewer sitting at center screen. Similarly, a lower gain below 1.0, as is sometimes found with ALR screens, will reduce the ft-L at the center seat. You can calculate the effect of screen gain on lumens just by multiplying: a 1.3 gain screen, for example, will deliver 1.3x the incoming brightness from the projector back to the viewer, or about 30% more brightness. We covered the subject of screen gain earlier in this article, and you can also read more in our Tech Talk article "What is Screen Gain?."
Another ProjectorCentral Tech Talk article, "A Simple Guide to Calculating Lumens," goes into detail on all this and also provides an easy formula to calculate how many ft-L you'll get from a projector's given lumen count for different screen sizes:
lumens = ft-L X screen area in square feet / screen gain
Though the formula is simple, calculating the screen area from the screen width and height can be cumbersome, so our article provides a handy table with the screen area of popular diagonal screen sizes in the 16:9 aspect ratio.
When you start shopping, you'll find that traditional home theater projectors range from about 1,500 to perhaps 3,500 ANSI lumens maximum brightness. However, you won't be seeing all of that on the screen, because the projector's brightest preset viewing mode often displays visibly tinted color you won't want to use for watching movies or TV. In fact, it's best to assume that the projector's most color-accurate modes will deliver about half to two-thirds, give or take a bit, of the projector's full brightness spec.
ProjectorCentral's product reviews usually list the results of our measured lumens test for each of the projector's color modes. But in the absence of confirmed measurements from a trusted source, you can always guesstimate. As an example, if you use the formula, a 1,200 lumen projector with a 100-inch diagonal, 1.0-gain, 16:9 screen will deliver about 40 ft-L coming off the screen in a dark room. Cut that in half to account for selection of a less-bright, more color-accurate picture mode, and you're left with about 20 ft-L. So, you might consider 1,200 lumens about the very bare minimum for dark-room theater on a 100-inch screen. If you raise your threshold to 1,500-1,800 lumens, you'll have some room to run things a little brighter in the dark or turn on some degree of ambient light. At a 150-inch diagonal screen size, you'll need about 2,600 lumens instead of 1,200 lumens for similar 20 ft-L brightness.
Note that you'll find more home theater projectors today spec'd at 2,500 lumens and higher than ever before as manufacturers have ratcheted up the brightness to account for some degree of ambient light. With some exceptions, you'll usually find that the extra brightness above 2,500 or so lumens comes at the expense of slightly less accurate color and a sacrifice in contrast performance compared with a given brand's similar dark-room projectors, but these projectors still provide an essentially accurate and highly satisfying image.
Step 4: Find Your Projector
At this point, you should know your screen size and your throw distance, have some idea of the expected screen gain, and been able to calculate about how many lumens you need. Congratulations—it's time to start culling through projector specs, features, and product reviews to find just the right model.
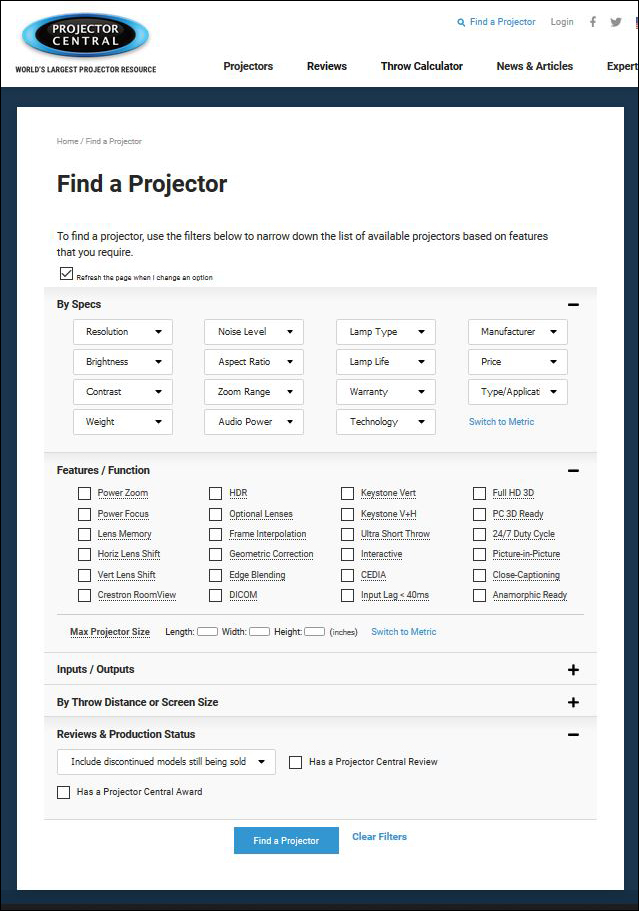
Fortunately, we've got you covered . ProjectorCentral's unique database lists more than 11,000 current and past projectors.. Our Find a Projector feature lets you search by criteria including Type/Application (i.e., Home Theater), Brightness (lumens), Resolution, Price, and others. Each projector found in your search has its own information page with key specs as well as the spec sheet and user manual, and a link to our proprietary Projector Throw Calculator. If we've reviewed that projector you'll find links to those articles as well. Finally, for most models that are available online, you'll see a current price link that will take you to authorized projector sellers..
Another great resource to consult are our Top Ten Home Theater Projectors lists provided for different price brackets. Though these rankings are not curated editorial recommendations, the lists are generated by constantly monitoring web traffic to our Find a Projector database, the price-quote engine connected with our affiliated projector resellers, our Projector Throw Calculator, and our editorial product coverage and reviews to gauge which projectors are generating the most buzz and sales activity.
Projector Specs & Features
What should you look for in specs, features, and performance? We've got a list below, but be aware that aside from overall brightness, the specs don't really tell you much. Projectors with similar specs often perform very differently. That's why it's so important to seek out and read expert and user reviews.
Brightness. Like the horsepower spec on an automobile, a projector's brightness spec tells you what kind of muscle it's got. We've discussed brightness above, but know that a projector from a reputable manufacturer will be marked in ANSI lumens or ISO 21118 lumens. The exception is that LED projectors will sometimes be specified as having "LED lumens" as an ANSI equivalent. In this case, the manufacturer is saying that the perceived brightness is equal to what you'd get witha lamp-based projector with that ANSI lumen spec, even though an ANSI measurement of the LED projector results in a lower number. You can read more about LED lumens in our article, "Are LED Lumens a Real Thing?."
Otherwise, if a projector's brightness spec is not clearly labeled ANSI or ISO lumens, you cannot properly judge its brightness against other projectors and the product or manufacturer should be viewed as suspect. Keep in mind, too, that even if a product comes from a reputable brand and is marked as having ANSI lumens, that maximum brightness still might not be achieved at the projector's brightest settings. We always conduct a standard 9-point ANSI measurement as described here on every projector we test, and they don't always meet spec—although they're usually within or close to the 10% ANSI tolerance.
Contrast Ratio. A home theater projector's contrast ratio is an important performance criterion, defined as the difference between the darkest black and brightest highlight the projector can reproduce. Contrast is what gives images dimensionality, makes black look black on darker scenes instead of a washed-out-gray, and makes shadow details and gradations more visible in darker areas of the picture. Unfortunately, contrast ratio specs are misleading and meaningless for comparing projectors of different brands. Unlike with brightness, there is no universally accepted standard or technique for reporting contrast ratio. These specs are only useful for understanding which projectors in a single manufacturer's current line are the highest performing. You'll have to read reviews to confirm a projector's real contrast performance.
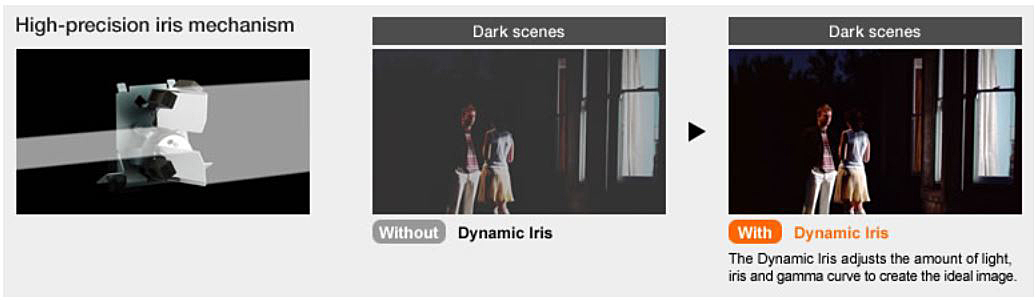
Nonetheless, good contrastand deeper blacks are often the most important reason to step up and pay more for a projector. Two key engineering decisions affect a projector's contrast. First is the native black level of the imaging devices themselves. If the imagers can only make light gray instead of something closer to black, overall dark scenes will have a washed-out haze over the image that's clearly visible when viewing in a dark environment. Deep native blacks, on the other hand, allow the projector to reveal fine gradations of light in dark areas and provide added dimensional realism and punch to every scene.
Beyond the native contrast of the imagers, projectors often have a mechanism—either a dynamic iris or dynamic contrast signal processing—to adjust the brightness on darker material and make the blacks appear deeper and richer. In the absence of deep native blacks there's only so much these tricks can do, but even the best projectors usually benefit from them. Better dark-room home theater projectors will have a dynamic iris.
All of that said, ambient light is the enemy of contrast and even small amounts of it will usually make it hard to see fine differences in black level and contrast among projectors. If you plan to do most of your viewing with the lights on, it may not make sense to pay more for a projector with better contrast.
Resolution. Ultra HD/4K resolution of 3840x2160 pixels is now the norm for new flatpanel TVs, but the projection world has been slower to adopt 4K and still brings out new 1080p (1920x1080) projectors each year. You can get a very good 1080p home theater projector for about $500 today and a quite excellent one for $750-$1,000. They're a cost-effective entry path into bigscreen home theater.
However, if you can spend $1,500-$2,000 on your projector you'll be in a sweet spot among budget UHD models. The additional detail provided by the extra pixels on the screen—approximately 8.3 million in a full UHD projector vs. 2.1 million for 1080p—are much more valuable and visible on a large projection screen than on a 65-inch flatpanel TV viewed from 10 feet away. More critically, a UHD projector opens up the world of 4K content from streaming services and UHD Blu-ray discs, which offer more than just extra sharpness. Better UHD projectors will also do a good job with content mastered for High Dynamic Range (HDR), which can demonstrably boost the brightness of highlights and further improve contrast. And they may offer wide color gamut as described below. These are discernable benefits you can see in a dark theater room.
It's important to understand that each of the three imaging technologies described earlier deliver 4K resolution to the screen differently. LCoS projectors from JVC and Sony are the only home theater projectors today to offer a true native 4K array on their imaging chips, in which all the pixels of a single frame of UHD video are presented to the viewer simultaneously. Virtually all UHD-resolution DLP projectors for home theater use Texas Instrument's fast-switching pixel-shift technology, which rapidly flashes up all 8.3 million pixels in a single frame of UHD video in either two or four phases (depending on the size of the chip). It happens so fast that the eye blends these sub-frames together, and because all of the individual pixels in the frame are ultimately delivered to the screen in the right time period, it is usually difficult if not impossible to discern the difference between this and a true native 4K projector. Any difference you do see is likely more attributable to differences in lens quality or image processing.
The highest-resolution 3LCD home theater projectors, all sold by Epson, use 1080p imaging chips that are pixel-shifted once to double the number of pixels delivered to the screen in a single frame. That adds up to only half of the full UHD pixel-count. However, Epson's pixel-shifting mechanism, sophisticated image processing, and lens optics go a long way toward making the sharpness of UHD content competitive with full UHD projectors. Our tests reveal that while you can see a difference in the size of the pixels with your nose up to the screen, any difference in perceived detail is difficult to discern from normal viewing distance.
You can learn more about pixel shifting and the different projection imaging technologies in "LCD, LCoS or DLP: Choosing a Projector Imaging Technology."
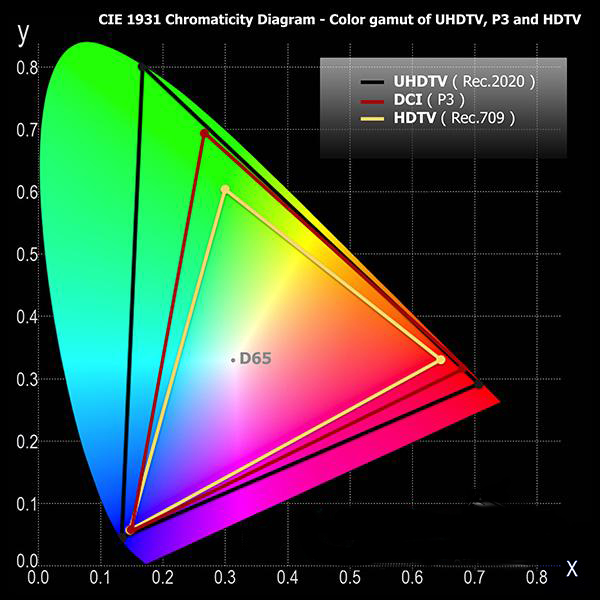
Color Gamut. A projector's color gamut describes the range of colors available for reproduction. Good 1080p home theater projectors meet the full Rec.709 color gamut created for high definition content. Better 4K/UHD projectors meet or come close to the full DCI-P3 specification currently used for 4K content. You can see the difference most notably in more deeply saturated and natural reds.. Going forward, UHD projectors will eventually meet the even larger Rec.2020 gamut built into the UHD spec. 4K UHD projectors that tout "wide color gamut" will usually reproduce something larger than Rec.709, and those that promote 100% DCI-P3 are likely high-performing models.
10-Bit or 12-Bit Color Depth. You won't find it on every product sheet, but color bit-depth, sometimes called color processing or video processing, is an important spec. While the color gamut determines the outside boundaries of a projector's ability to mimic colors found in real life, the color bit-depth determines how many individual colors or gradations of color the projector can recreate. This in turn determines how smoothly it can transition from, for example, the deep yellow of the sun in a sunset to the surrouning orange halo and the bluer sky beyond. If color bit-depth is insufficient, the steps of those smooth, natural transitions will exhibit noticeable banding artifacts.
The Rec.709 color standard used for 1080p content calls for a minimum of 8 bits, which is known to exhibit obvious banding on some types of scenes. UHD HDR content (see below) is usually mastered with 10-bit depth and shows noticeably smoother transitions. If you're buying a modern UHD projector with HDR capability, it should have 10-bit or 12-bit color processing. Our article "The Deep Dive on Bit Depth" goes into more detail and offers a downloadable, animated HDR video clip that can be used to verify whether a projector maintains 10-bit processing from its video input all the way to the screen.
HDR Compatibility and Controls. As described above, the ability to play UHD HDR content—and do it well—is a significant feature in a dark-room home theater projector. Plenty of projectors, even some 1080p models, claim the ability to play back HDR signals. But unlike flatpanel TVs, which are inherently brighter, HDR projectors must make significant internal adjustments to adapt the content to their capabilities. This "tone-mapping" differs by brand and model, and when poorly-executed can leave HDR content looking flat and washed out in the dark areas, or with blown-out and unnatural highlights in the bright areas. Our product reviews always discuss HDR performance. Note that there are several types of HDR content, each requiring a compatible display. HDR10 is widely used in UHD discs and movie streams, and what we typically report on.

An HDR projector will usually have some kind of HDR brightness control. This allows fine-tuning of the tone-map to accommodate variations in the mastering of HDR programs. Better projectors may provide a wider range of adjustment. Some HDR projectors now have dynamic tone-mapping that monitors the incoming signal and adjusts on the fly so no extra tuning is needed with most programs.
D65 Color Mode. Most projectors offers a choice of factory-tuned picture modes with different color profiles and brightness. ProjectorCentral adheres to the notion that an "accurate" image follows widely accepted production standards used to create high definition and UHD movie and TV content. This is the stance promoted by organizations like the Imaging Science Foundation and THX, among others—that if you want to see a picture that looks like what the creators signed off on, your home display should be mimic their studio monitors.
Better home theater projectors have a color mode that closely follows these industry standards, including a neutral-gray "D65" color temperature for white. (If you study the chromaticity diagram in the Color Gamut section above, you can see the D65 white point marked in the center.) That mode will often be labeled the Cinema or Movie mode, and will usually sacrifice some brightness compared with the default out-of-box picture mode in return for greater color accuracy. It will usually deliver the most accurate skin tones and most natural colors on everyday objects we know like foliage and blue skys. For our reviews, we use test instruments to find the best picture modes.
Zoom Lens. A zoom lens allows flexibility in projector placement by letting you fill the same size screen from a range of throw distances (that is, the distance from the lens to the screen). A fixed lens, by comparison, equires placement at a precise distance for any given screen size. You'll see projectors noted as having a "1.2x" or "1.6x" zoom, which represents the ratio of the focal point from the widest to the longest lens position. Keep in mind that you'll lonly set up your projector once for a permanent install. If you can position the projector appropriately it may not make sense to pay more just to get a longer zoom.
Lens Vertical Offset and Lens Shift. Our Tech Talk article "Understanding Lens Offset and Lens Shift" is a great resource on this potentially confusing topic. Every projector lens has a fixed vertical offset that usually makes the projected image fall somewhere above the height of the lens when the projector is resting on a surface. That way, if the projector is placed on a table the image will float where the audience can see it without any tilting of the projector that would cause trapezoidal "keystone" distortion. If the projector is inverted for a ceiling mount, the vertical offset allows it to be placed close to the ceiling.
Some projectors have vertical and or horizontal lens shift that allows you to move the entire image up/down (vertical) or left/right (horizontal). This will be given as a percent change from the default vertical offset or horizontally centered lens position. Vertical shift is more valuable, sincemounting the projector square to the screen eliminates the need for horizontal shift.

Powered Zoom, Shift, Focus with Lens Memory. Motorized zoom, lens shift, and focus controls accessible from the remote are a feature reserved for better projectors. Powered lens control is often mated these days with storable memories that can facilitate the use of a widescreen 2.4:1 screen as described above. Whether you're watching 16:9 broadcast programming or widescreen movie content, hitting a single button will adjust these parameters to maintain a constant image height with each type of programming. Our article "When Widescreens Work: How to Pick the Right Aspect Ratio" will give you some background, but keep in mind that only a few projectors come with this feature.
Input Lag. Input lag describes the time delay that occurs between the moment when the projector receives the signal for a particular frame of video and when that image actually hits the screen. It's critical for serious gamers; long input lag causes the onscreen image to be out of sync with actions on the controller.
Input lag is often left off projector spec sheets and is usually only mentioned for specialty gaming projectors, which tout input lag as low as 8 to 16 milliseconds. Many general home theater projectors havelag in the 50 to 100 ms range or higher, which is suitable only for casual gaming at best. We measure input lag and report the result for most of our home theater projector reviews.
Fan Noise. Fan noise specs can be helpful for comparing projectors but the numbers don't reflect the pitch of the noise, affects its intrusiveness. Most home theater projectors deliver fan noise that won't be distracting when a soundtrack is playing, but if you require a projector's High Altitude Mode, that will crank the fan much harder and you may find it necessary to acoustically isolate the projector in some fashion.
3D Playback. Playback of Full HD (1080p) 3D Blu-rays has disappeared from TVs but is still found in many projectors. You'll need to buy compatible glasses, and with some projectors, a separate emitter. Don't assume a projector touting 3D will handle it well. Some aren't bright enough or deliver good color in 3D. Target brighter projectors with 2,500 or more lumens if 3D is important to you, and read the reviews.
Conclusion
If you've made a study of this article you should now have an excellent grasp of how projectors work and what makes one better than the next. You should also be prepared to select a projector that fits the needs of your space and your own performance requirements. There's always more to learn, and we encourage you to consult the many linked articles that will deepen your knowledge. But nothing beats the end result of immersing yourself, your family, and your friends in the thrill of that big, beautiful picture. Enjoy the journey as well as the destination, and we look forward to you coming back to ProjectorCentral often for new features and reviews of the latest cutting edge home theater projectors.
Also, can you tell me what the lifetime of a retractable screen should be? 10 years of service moving up and down twice a day is 7300 cycles. Is that too much to ask of a retractable screen? I never seen that published anywhere in screen specs. Most people will replace their projectors more often than their screens, so splurging on a higher quality screen makes sense.
Again, great job pulling this together with all the links for more in-depth info!
Mike
Thanks!
If you could do a survey of projection fans and ask them if their laser projection has reached 25,000 hours or did their projector surpass the 25,000 and by how much? I'd be interested to see the results.
With laser projectors, the laser diodes reach the rated life threshold and then tend to fail quickly; maybe not all the diodes at once but they will drop off fairly rapidly. So my understanding is that you may end up with a projector that is suddenly dimmer by a noticeable amount because one of the diode banks has failed, or which fails fully. The upside is that the lasers don't lose very much brightness over time and show signs of continuous aging the way lamps do.

